Follow Me On Social Media!

Oreo Cake Recipe
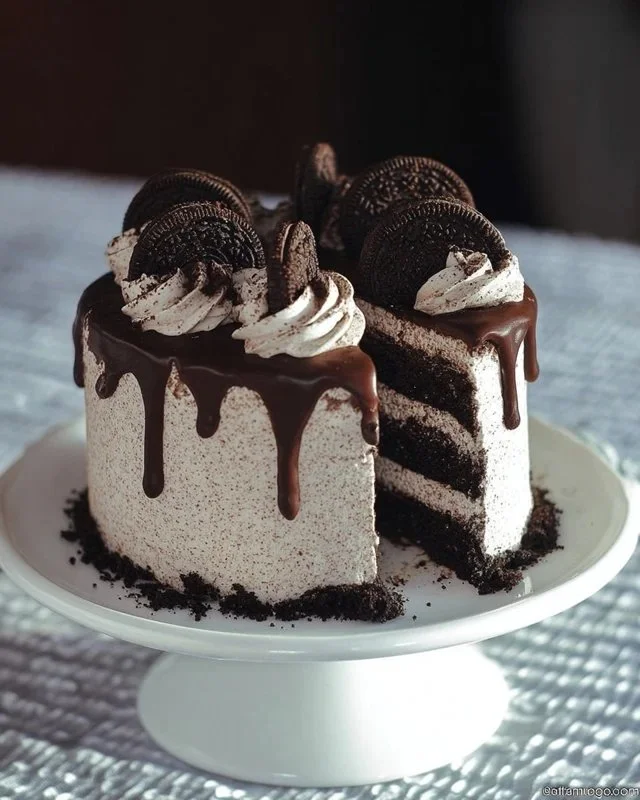
About This Oreo Cake Recipe
This Oreo cake recipe is rich, bold, and full of deep chocolate flavor. It has soft chocolate sponge layers, a smooth Oreo buttercream, and a shiny chocolate drip. You get crunch, cream, and chocolate in every bite. If you love Oreos, you will love this cake. It looks fancy, but you can make it at home with simple tools. The steps are clear and easy to follow. The cake feels light yet moist. The buttercream is silky and not too sweet. The drip adds a fun look and a glossy finish.
This recipe uses three six-inch layers. The size makes the cake tall and pretty. You fill and frost the cake with Oreo buttercream. You add Oreo crumbs around the base. You finish with a shiny chocolate drip and swirls on top. You add more Oreo cookies on the top if you like.
You can bake the layers ahead. You can make the buttercream in advance. You can chill the cake and add the drip later. This makes the process simple. You can spread the work over one or two days if you prefer. The result is a showpiece dessert that fits birthdays, holidays, and any celebration. It also works for bake sales, potlucks, or a fun weekend project.
You do not need special cake skills to do this. You only need to follow the steps, measure well, and keep the ingredients at the right temperature. The batter method is simple. The buttercream uses egg whites and sugar, which you warm and then whip. This gives a smooth and stable frosting that holds its shape. The drip uses chocolate and cream. You melt them, let the mixture cool a bit, then drip it around the edges. The drip looks fancy, but it is easy.
This cake has balance. You get deep cocoa in the layers. You get creamy vanilla and Oreo in the frosting. You get a smooth, rich chocolate drip. The textures work well together. The cake feels moist and soft. The frosting feels light and silky. The drip adds a gentle bite and a glossy look.
Make this cake for the Oreo fans in your life. Or make it to learn new cake skills in a simple way. When you slice it, the layers look neat and bold. It tastes even better than it looks.
Why Make This Recipe
- Big Oreo flavor: You use Oreo crumbs in the buttercream and on the cake. Every slice tastes like cookies and cream.
- Moist chocolate sponge: The cocoa gives a rich taste. The method makes the layers soft and even.
- Silky buttercream: The egg whites and sugar whip into a smooth, stable frosting. It is not gritty. It spreads well and pipes clean swirls.
- Clean, tall look: The cake uses three six-inch layers. This makes a tall cake with neat edges and a sharp finish.
- Easy drip finish: The chocolate ganache drip adds a pro look with very simple steps.
- Make-ahead friendly: You can bake and freeze the layers. You can make the buttercream early and re-whip it. You can assemble the cake in stages.
- Crowd-pleaser: Kids and adults love Oreos. This cake fits birthdays, parties, and events.
- Clear steps: The directions and tips guide you through mixing, baking, frosting, and dripping.
- Flexible: You can add extra crumbs, change the drip, or try different piping styles.
- Reliable: The ingredient amounts and steps give consistent results when you follow them.
How to Make Oreo Cake Recipe
Here is a simple overview of the process:
- Make the chocolate cake layers
- Cream the butter and sugar until pale and fluffy. This traps air and makes the cake soft.
- Add vanilla and eggs one by one. Mix until smooth after each egg. Do not rush this step.
- Mix the dry ingredients in a separate bowl. This spreads the baking powder evenly.
- Fold the dry ingredients into the batter gently. Use a large metal spoon. Keep as much air as possible.
- Divide the batter into three greased and lined six-inch pans. Weigh the batter for even layers if you can.
- Bake until a skewer comes out clean. Cool in the pans, then on a rack.
- Make the Oreo buttercream
- Heat egg whites and sugar over simmering water. Stir until the sugar dissolves. Test by rubbing a drop between your fingers.
- Whip on high speed until the bowl feels cool and the meringue forms glossy peaks. This takes time. Do not rush it.
- Add room temperature butter a little at a time. Keep the mixer on medium speed. The mixture may look loose or curdled for a bit. Keep mixing. It will turn silky.
- Add vanilla. Add Oreo crumbs. Mix to combine.
- Save 1 cup of buttercream for swirls on top.
- Assemble the cake
- Level the cake layers if needed.
- Place the first layer on a board. Add an even layer of Oreo buttercream.
- Add the second layer. Add more buttercream.
- Add the third layer. Press lightly to set.
- Apply a thin crumb coat to trap crumbs. Chill until set.
- Apply a final coat of buttercream. Smooth the sides and top.
- While the frosting is still soft, press Oreo crumbs into the bottom half of the cake. Chill the cake.
- Make the chocolate drip
- Heat chocolate and cream together in short bursts. Stir until smooth.
- Let the ganache cool until it is still pourable but not hot. If it is too warm, it will melt your frosting.
- Transfer to a piping bag or a squeeze bottle.
- Chill the cake. Then drip the ganache around the edges. Fill the top with a thin layer if you like.
- Finish the décor
- Pipe buttercream swirls on top with the saved cup of frosting.
- Add more Oreo cookies for a bold finish.
These steps build a cake that looks clean and tastes rich. Each part is simple. When you put them together, you get a stunning result.
Ingredients:
- 250g butter, 250g soft brown sugar, 1/2 tsp vanilla extract, 4 eggs, 160g flour, 90g cocoa powder (100%), 10g baking powder, 5 room temperature egg whites, 300g caster sugar, 452g room temperature butter, 1 teaspoon vanilla extract, 2 cup crushed Oreos into powder, 1 cup chocolate , 1/4 – 1/2 cup cream
Directions:
- In a mixer fitter with paddle attachment beat sugar and butter for about 10 minutes until paler and fluffy.
- With the mixer on medium speed, add the vanilla, then add one egg at a time until combined.
- In a separate bowl mix together the dry ingredients.
- Take the mixture off the mixer and fold in the dry ingredients with a large metal spoon until combined.
- Divide the batter equally into 3 six inch round cake pan lined with parchment paper and greased (about 300 g in each tin).
- Bake at 180 deg. C. for about 25-30 minutes until a skewer come out clean when inserted into the center.
- Let cakes cool in pan, then transfer onto wire rack to cool.
- In the bowl of a standing mixer, add sugar and egg whites and heat over a pan of water on medium heat until sugar is dissolved.
- Rub with fingers to test if the sugar has dissolved.
- Beat using the whisk attachment on your standing mixer, for about 15-20 minutes until the mixture comes to room temperature and the bowl is completely cool to the touch.
- Add the butter in cubes, piece by piece, on medium speed with mixer on until all the butter has been incorporated.
- Add vanilla and beat to combine.
- Add 1 cup of Oreo cookie crumbs/dust and mix to combine.
- Separate 1 cup of the finished buttercream for swirls on top.
- Fill and frost cake.
- While cake frosting is still soft, add Oreo cookie crumbs to the bottom half of the cake. Refrigerate your cake while you make the chocolate drip.
- Add chocolate and cream to a heat proof bowl.
- Heat in microwave at 30 second intervals until fully combined.
- Add to a piping bag or squirt bottle. Let the ganache cool slightly so it won’t melt the frosting, but is still pourable.
- Drizzle chocolate ganache over the cooled cake.
- Finish the décor with buttercream swirls and more Oreo cookies.
How to Serve Oreo Cake Recipe
- Serve chilled but not cold: Take the cake out of the fridge 20–30 minutes before serving. This softens the buttercream and brings out the flavor.
- Slice with a hot knife: Dip a long knife in hot water. Wipe it dry. Cut straight down. Clean and warm the knife between cuts for neat slices.
- Portion guide: For a three-layer six-inch cake, you can get 10–12 party slices or up to 16 small slices.
- Plate with contrast: Use white plates for a bold look. The dark crumb and white swirls stand out.
- Add a drizzle: If you like, add extra warm ganache on the plates. Or drizzle chocolate sauce for a café style finish.
- Pair with sides: A glass of cold milk, a shot of espresso, or a scoop of vanilla or cookies-and-cream ice cream goes very well.
- Garnish fresh: Add a few extra Oreo halves or crumbs just before serving for crunch and style.
How to Store Oreo Cake Recipe
- Short-term (1–2 days): Keep the cake in the fridge in a cake box or covered container. The buttercream stays firm and clean.
- Medium-term (3–4 days): Keep chilled and covered. The cake stays moist. The crumbs on the side stay crisp for the first day and soften later.
- Long-term (freeze up to 2 months):
- Freeze unfrosted layers: Wrap each layer tightly in plastic, then foil. Thaw wrapped at room temperature, then unwrap and assemble.
- Freeze frosted slices: Chill the cake until firm. Wrap each slice in plastic and place in a freezer-safe box. Thaw overnight in the fridge or at room temperature for 1–2 hours.
- Buttercream storage: Store extra buttercream in an airtight container in the fridge for up to 1 week or freeze up to 2 months. To use, bring to room temperature and re-whip until smooth.
- Ganache storage: Keep extra ganache covered in the fridge for 1 week. Warm gently to soften before use.
- Room temperature notes: Because the buttercream contains egg whites, keep the cake chilled when possible. For serving, you can leave it at room temperature for up to 2 hours.
Tips to Make Oreo Cake Recipe
- Measure carefully:
- Weigh the batter for even layers (about 300 g per six-inch pan).
- Level the tops if needed for a stable stack.
- Use room temperature ingredients:
- Butter, eggs, and egg whites should be at room temperature. This helps them mix smoothly.
- Cold butter will not cream well. Cold egg whites will take longer to warm and whip.
- Cream butter and sugar well:
- Beat until the mixture looks pale and fluffy. This step adds air and gives a lighter crumb.
- Scrape the bowl often so no sugar sticks on the sides.
- Add eggs slowly:
- Add one egg at a time with the mixer on medium speed.
- Mix until each egg disappears into the batter before adding the next.
- Mix dry ingredients first:
- Combine flour, cocoa, and baking powder in a bowl before folding into the batter. This helps even rising.
- Fold gently:
- Remove the bowl from the mixer and fold in the dry ingredients with a large metal spoon.
- Stop when no dry bits remain. Do not overmix.
- Prepare pans well:
- Grease the pans and line them with parchment circles. This stops sticking and keeps edges clean.
- Bake smart:
- Check at 25 minutes. Use a skewer. It should come out clean or with a few moist crumbs, not wet batter.
- Cool in pans for 10–15 minutes, then move to a wire rack to cool fully.
- Make smooth buttercream:
- Warm the egg whites and sugar over simmering water, not boiling water. Stir the whole time.
- Test by rubbing a little between your fingers. It should feel smooth, not gritty.
- Whip until the bowl feels cool and the meringue stands in glossy peaks. This can take 15–20 minutes.
- Add soft butter a piece at a time. If the mix looks soupy or curdled, keep mixing. It will come together.
- Fix buttercream fast:
- If it looks runny, chill the bowl for 10 minutes, then whip again.
- If it looks too firm, warm the bowl slightly or add a small knob of soft butter and whip.
- Add Oreos at the right time:
- Add crumbs after the butter is smooth and silky. Mix just until combined.
- Do not overmix once the crumbs are in or you may lose some texture.
- Build a stable cake:
- Place a small dab of frosting on the board to anchor the first layer.
- Use a turntable for even frosting if you have one.
- Apply a thin crumb coat, chill until firm, then apply the final coat.
- Clean finish with crumbs:
- While the outer frosting is still soft, press Oreo crumbs on the bottom half. Use a baking sheet under your cake to catch excess.
- Perfect ganache drip:
- Let the ganache cool until it feels slightly warm, not hot. It should flow but not run.
- Test on the back of the cake or on a cold bowl. Adjust with a bit more cream if too thick, or let it cool longer if too thin.
- Drip on a cold cake for a neat set.
- Pipe neat swirls:
- Use a star tip for defined ridges. Hold the bag straight up. Apply steady pressure. Release and pull up for a clean finish.
- Slice clean:
- Heat the knife in hot water. Wipe dry. Cut straight down. Clean and reheat the knife between slices.
- Plan ahead:
- Bake layers the day before. Wrap and chill. They will be easier to frost.
- Make the buttercream ahead and re-whip on the day you frost.
Variation (if any)
- Double-stuffed Oreo cake: Add extra Oreo crumbs between layers for more crunch. You can also add chopped Oreo pieces into the filling.
- Mint Oreo cake: Add 1/2 teaspoon peppermint extract to the buttercream along with the vanilla. Decorate with mint Oreos.
- Strawberry Oreo cake: Spread a thin layer of strawberry jam between the cake layers under the buttercream. Add freeze-dried strawberry crumbs on top.
- Peanut butter twist: Add 2–3 tablespoons smooth peanut butter to a portion of the buttercream for a peanut butter stripe between layers. Decorate with mini peanut butter cups.
- White chocolate drip: Swap the dark chocolate with white chocolate for a bright contrast. Tint the ganache with a tiny drop of gel color if you want.
- Birthday party style: Add a few chocolate sprinkles along the base with the Oreo crumbs. Top with colorful candles.
- Extra dark cocoa: Use black cocoa for an Oreo-like cake layer color. Keep the recipe amounts the same.
- Mini cakes or cupcakes: Bake the batter as 12–15 cupcakes. Bake at 180°C for about 18–22 minutes. Pipe Oreo buttercream swirls and add mini Oreos.
- Sheet cake version: Bake in a 9×13-inch pan at 180°C for about 25–35 minutes. Frost the top with Oreo buttercream and add a drip along the edges if you like.
FAQs
- Can I use regular granulated sugar instead of caster sugar for the buttercream?
- Yes, but caster sugar dissolves faster. If you use granulated sugar, heat and stir a bit longer until it feels smooth between your fingers before whipping.
- Can I make the cake layers ahead?
- Yes. Bake, cool, wrap tightly, and chill up to 3 days or freeze up to 2 months. Thaw wrapped at room temperature before assembling.
- My buttercream looks curdled. Did I ruin it?
- No. Keep mixing. If it still looks broken, chill the bowl for 10 minutes and whip again. It will turn smooth.
- How do I stop the drip from melting the frosting?
- Let the ganache cool until it is only slightly warm and keep the cake cold. Test one drip first. If it runs too far, cool the ganache more.
- Can I use Dutch-process cocoa?
- Yes. This recipe includes baking powder, so Dutch-process cocoa works well and gives a deep chocolate flavor.
- Can I reduce the sweetness?
- Use bittersweet chocolate for the ganache. Add a pinch of salt to the buttercream. Do not add extra sugar.
- Can I add whole Oreo pieces to the batter?
- It is better to keep them in the buttercream or as a filling. Whole pieces in the batter can sink and make uneven slices.
- How do I get sharp edges on the cake?
- Chill the crumb coat. Apply the final coat and use a bench scraper while the cake spins on a turntable. Chill again to set.
- What tip should I use for swirls?
- Use a large open star tip (like 1M or 2D). These tips create tall, clean swirls that hold Oreo crumbs well.
- How many people does this cake serve?
- A tall six-inch cake serves 10–12 party slices or up to 16 smaller slices.
- Can I color the buttercream?
- You can tint the non-Oreo portion with gel color. Keep in mind the Oreo crumbs will darken the color. For bright colors, save a separate batch without crumbs.
- What if I do not have a stand mixer?
- You can use a hand mixer. Whipping the meringue may take a bit longer. Hold the bowl over the steam carefully and whip until cool.
- Can I skip the drip?
- Yes. The cake looks great with just Oreo buttercream and swirls. You can add extra Oreo crumbs or chocolate shavings on top.
- Can I use milk instead of cream for ganache?
- Cream makes the drip smooth and stable. Milk can work in a pinch, but the drip will be thinner. Start with less milk and test the flow.
- How do I store leftovers?
- Place slices in an airtight container in the fridge for up to 4 days. Warm at room temperature for 15–20 minutes before serving for the best texture.
This Oreo cake recipe brings deep chocolate layers, silky Oreo buttercream, and a shiny drip together. Follow the clear steps and tips above, and you will make a beautiful cake that tastes even better than it looks. Enjoy every slice.
Print
Oreo Cake
- Total Time: 90 minutes
- Yield: 10-12 servings 1x
- Diet: Vegetarian
Description
A rich and bold Oreo cake with soft chocolate sponge layers, smooth Oreo buttercream, and a shiny chocolate drip, perfect for any celebration.
Ingredients
Scale
- 250g butter
- 250g soft brown sugar
- 1/2 tsp vanilla extract
- 4 eggs
- 160g flour
- 90g cocoa powder (100%)
- 10g baking powder
- 5 room temperature egg whites
- 300g caster sugar
- 452g room temperature butter
- 1 tsp vanilla extract
- 2 cups crushed Oreos into powder
- 1 cup chocolate
- 1/4 – 1/2 cup cream
Instructions
- Beat sugar and butter for about 10 minutes until pale and fluffy.
- Add vanilla and then add eggs one at a time until combined.
- Mix dry ingredients in a separate bowl.
- Fold dry ingredients into the batter gently.
- Divide batter into three greased and lined six-inch pans.
- Bake at 180°C for 25-30 minutes until a skewer comes out clean.
- Cool in pans, then transfer to a wire rack.
- Heat egg whites and sugar over simmering water until sugar is dissolved, then whip until cool and glossy.
- Add butter gradually and mix, then add vanilla and Oreo crumbs.
- Assemble the cake with layers of buttercream in between.
- Apply a crumb coat and chill.
- Add final buttercream coat and press Oreo crumbs on the bottom half.
- Make the chocolate drip using heated chocolate and cream, allow to cool slightly, then drip on the cake.
- Finish with buttercream swirls and additional Oreos on top.
Notes
Let the cake sit at room temperature for 20–30 minutes before serving to soften the buttercream. Use a hot knife for neat slices.
- Prep Time: 60 minutes
- Cook Time: 30 minutes
- Category: Dessert
- Method: Baking
- Cuisine: American
Nutrition
- Serving Size: 1 slice
- Calories: 450
- Sugar: 30g
- Sodium: 250mg
- Fat: 22g
- Saturated Fat: 10g
- Unsaturated Fat: 8g
- Trans Fat: 0g
- Carbohydrates: 55g
- Fiber: 2g
- Protein: 6g
- Cholesterol: 80mg
Keywords: Oreo cake, chocolate cake, dessert, birthday cake, celebration cake