
Follow Me On Social Media!
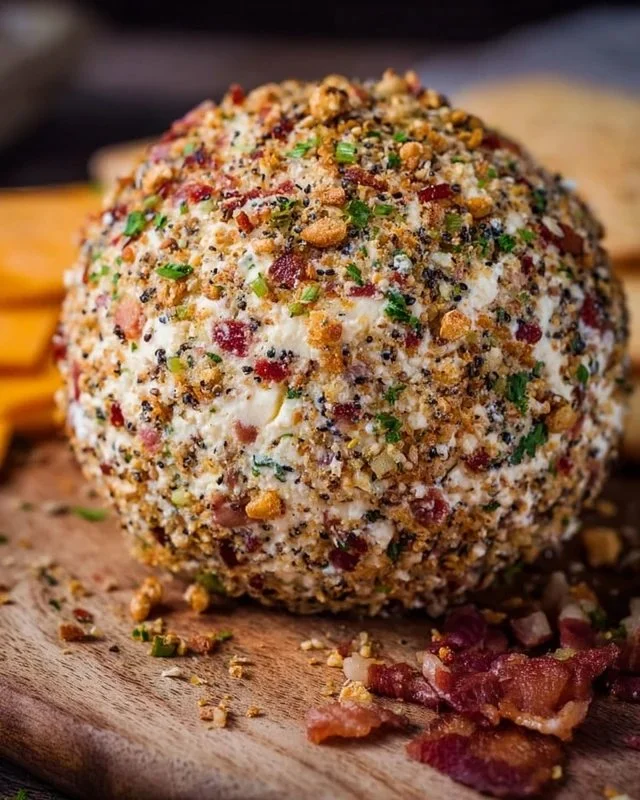
Homemade Cheese Ball
Homemade Cheese Ball
A homemade cheese ball makes people smile. It looks fun, tastes rich and creamy, and feeds a crowd with very little work. You mix a few simple ingredients, chill the mixture, and serve it with crackers or veggies. That is it. No cooking. No fancy gear. Just big flavor in a quick, easy snack.
This version uses cream cheese, cheddar, bacon bits, and Ranch seasoning. The mix tastes savory and bold, with a little tang from the Ranch and a mild sharpness from the cheddar. Bacon adds smoky, salty bites here and there. If you like green onions, toss them in for a fresh, mild onion note. If you want crunch, roll the ball in chopped nuts for a crisp, nutty shell. You can keep it classic or change it to fit your taste.
A cheese ball works for almost any gathering. Put it out for game day. Serve it for the holidays. Bring it to a potluck. Use it as a quick happy hour snack at home. This recipe fits all those moments. It also saves you time because you can make it ahead and keep it chilled until guests arrive.
You do not need cooking skills to make this. If you can stir, you can make this cheese ball. You can also shape it in different ways. Make one big ball. Make two small balls. Or roll the mixture into mini balls for bite-size snacks. Whatever shape you choose, you get a creamy center and a tasty coating. It looks special, but it is very simple.
If you want a starter that people actually eat, this is it. It’s rich, salty, and satisfying. It pairs well with many dippers. It travels well. It holds up on a party table. And it costs less than many store-bought trays. You can control the flavor, the salt level, the spice, and the add-ins. That makes this recipe both practical and fun.
Why Make This Recipe
- It is very easy. You only mix, shape, and chill.
- It is fast. You can prep it in about 10 minutes.
- It is no-cook. You do not turn on the stove or oven.
- It is make-ahead. Chill it hours or a day before the party.
- It feeds a crowd. One ball serves many people with dippers.
- It is flexible. You can add onions, switch coatings, or skip nuts.
- It is budget-friendly. Simple ingredients keep the cost low.
- It looks great. A neat round ball with a crunchy coat looks fancy.
- It travels well. Wrap it and bring it anywhere.
- It works year-round. From holidays to picnics, it fits all events.
- It is reliable. The flavor is bold and crowd-pleasing.
- It scales up or down. Double it or make mini cheese balls for variety.
How to Make Homemade Cheese Ball
You only need a bowl, a spatula or spoon, and plastic wrap. Soft cream cheese mixes best, so let it sit out until it feels soft and spreadable. Shred your cheddar if you can. Freshly shredded cheddar blends in better than pre-shredded cheese, which can feel a bit dry. Bacon bits add salty crunch, and Ranch seasoning adds big flavor fast. If you want a fresh bite, stir in chopped green onions. For texture, roll the ball in chopped nuts.
Here is the basic flow:
- Soften the cream cheese. Plan 30 to 60 minutes at room temp.
- Mix all the ingredients in a bowl until smooth and even.
- Shape the mixture into a ball. Use plastic wrap to help you shape.
- Roll the ball in chopped nuts if you like a crunchy coating.
- Wrap it tight and chill at least 2 hours so it firms up.
- Serve it with crackers or veggies.
Helpful details and simple tips:
- Soften the cream cheese: If you need it faster, cut it into cubes and leave it on the counter for 20 to 30 minutes. You can also microwave it on low power in short bursts (about 10 seconds at a time), but do not melt it.
- Mix well: Use a sturdy spatula, a spoon, or a hand mixer on low. Scrape the sides of the bowl so no dry Ranch mix hides in a corner. You want an even, smooth mixture.
- Adjust flavor: Taste a small bit. Ranch and bacon can be salty. If you plan to use salty crackers, you may not need any extra salt at all.
- Shape cleanly: Lay a sheet of plastic wrap on the counter. Scoop the mixture onto the wrap. Pull the wrap up around it and twist the top to tighten. Use your hands to shape it into a round ball inside the wrap. This keeps your hands clean and makes a smoother ball.
- Coat evenly: Put chopped nuts on a plate. Unwrap the ball and roll it gently to cover the surface. Press lightly so the nuts stick but do not smash the ball.
- Chill time: Chill at least 2 hours so the ball firms up and holds its shape. You can chill it overnight for even better flavor and texture.
- Serving temp: Let it sit at room temp for 10 to 15 minutes before serving. It will spread easier, and the flavor will open up.
Mini cheese balls option:
- Scoop the mixture with a tablespoon or a small cookie scoop.
- Roll each scoop into a small ball.
- Coat in chopped nuts, crushed pretzels, or chopped bacon.
- Chill on a tray. Serve with toothpicks. These are easy to grab and great for big parties.
Ingredients
- 8 oz cream cheese, softened
- 1 cup shredded cheddar cheese
- 1/2 cup bacon bits
- 1 packet Ranch seasoning mix
- 1/4 cup chopped green onions (optional)
- 1/2 cup chopped nuts (optional, for coating)
Directions
- In a mixing bowl, combine the softened cream cheese, shredded cheddar cheese, bacon bits, and Ranch seasoning mix. Mix until well combined.
- Form the mixture into a ball shape, rolling it in chopped nuts if desired.
- Wrap in plastic wrap and refrigerate for at least 2 hours to firm up.
- Serve with crackers or veggies.
How to Serve Homemade Cheese Ball
You can serve this cheese ball in many simple and tasty ways. Keep it cold until guests arrive, then set it out with a spreader knife and dippers. Here are some easy serving ideas:
- Crackers: Butter crackers, wheat crackers, multigrain crackers, or classic round crackers all work well. Pick a mix of plain and seeded crackers to make a nice contrast.
- Veggies: Carrot sticks, celery sticks, cucumber slices, bell pepper strips, cherry tomatoes, snap peas, and broccoli florets give fresh crunch and color.
- Bread: Sliced baguette, crostini, pita wedges, or small rye bread slices make sturdy dippers.
- Pretzels: Pretzel crisps or small pretzels add a salty, crunchy bite.
- Chips: Kettle chips, pita chips, or bagel chips bring a hearty crunch.
- Apple slices: Thin, crisp apple slices give a fresh, sweet note that pairs well with cheddar and bacon.
Garnish ideas:
- Add a sprinkle of chopped green onions on top for color.
- Use a little extra cheddar on the plate for a bright look.
- Add a ring of nuts around the ball if you did not coat the outside.
- Set the ball in the center of a platter and arrange dippers in a circle around it.
Serving tips:
- Let the ball sit at room temperature for 10 to 15 minutes before serving. It will spread more easily.
- Provide a small cheese spreader or butter knife so guests do not crush the dippers.
- Refill the platter. Keep extra crackers and veggies nearby so you can restock fast.
- For a neat look, pre-slice some veggies and bread in even sizes so everything stacks well.
Portion guide:
- One cheese ball usually serves 8 to 12 people as a snack, depending on how many other foods you offer. If you have a big group, make two balls or make one large ball and extra mini balls.
How to Store Homemade Cheese Ball
- Refrigerate: Wrap the cheese ball tightly in plastic wrap. Place it in an airtight container to avoid fridge smells. Store it in the refrigerator for up to 4 to 5 days. If you rolled it in nuts, the nuts may soften a little over time but will still taste good.
- Make-ahead: You can make the ball 1 to 2 days in advance. Chill it tightly wrapped. Add the nut coating up to a day before serving for the best crunch, or coat it just before you set it out.
- Freezing (optional): You can freeze the cheese ball without the nut coating. Wrap it in plastic wrap and then in a layer of foil. Freeze for up to 1 month for best texture. Thaw it in the fridge overnight. Roll in nuts after it thaws. Note that freezing can change texture slightly, but it still tastes good.
- Leftovers: After serving, re-wrap the leftover cheese ball and put it back in the fridge within 2 hours. If it sat out longer than 2 hours at room temperature, play it safe and discard it.
- Transport: Keep it cold in a cooler bag with an ice pack. Carry the dippers in separate containers and arrange them on the platter when you arrive.
Tips to Make Homemade Cheese Ball
- Soften cream cheese fully. Soft cheese blends better and makes a smoother ball.
- Shred cheddar from a block, if possible. It mixes better and sticks into the cream cheese more easily.
- Taste as you go. Ranch and bacon are salty. You may not need any extra salt.
- Keep mix-ins dry. Pat green onions dry and shake off any moisture. Dry bacon bits mix better and do not make the ball greasy.
- Use a hand mixer if you like. It makes quick work of mixing and gives a smooth texture.
- Shape with plastic wrap. It helps you form a clean ball with less mess.
- Chill long enough. Give it at least 2 hours to firm up. Overnight is even better.
- Roll just before serving. If you use nuts, roll the ball in them close to serving time for the best crunch.
- Chop nuts finely. Finely chopped nuts stick better and make a smoother coating. Walnuts, pecans, or almonds all work well.
- Try a nut-free coat. Use crushed pretzels, crushed crackers, everything bagel seasoning, chopped cooked bacon, or minced herbs for crunch without nuts.
- Keep it balanced. The ball should taste creamy with pops of cheddar and bacon. Do not overload it with too many add-ins or it may crumble.
- Make it mini. Roll the mixture into small balls for easy single-serve bites. Add toothpicks for clean serving.
- Add heat if you want. A pinch of crushed red pepper or a few minced jalapeños can add a gentle kick.
- Plan your dippers. Mix soft and crunchy, salty and fresh, so guests can build different bites.
- Clean presentation. Wipe the platter edges and spread the dippers neatly around the ball. Small touches make it look pro.
- For easy slicing. Chill very firm if you plan to slice it instead of spread it. Then set it out a few minutes so it does not crack when you cut into it.
- Double the recipe. For a large party, make two cheese balls. Serve one early and keep one chilled to swap in later.
- Label for allergies. If you use nuts, mark the platter so guests with allergies know to avoid it. Offer a nut-free version if needed.
Variation (if any)
You can change this cheese ball in many simple ways. Keep the base the same and swap coatings or add small flavor twists.
- Nut-free coating: Use crushed pretzels, crushed crackers, crushed tortilla chips, panko breadcrumbs (toasted), or everything bagel seasoning.
- Extra onion flavor: Stir in the optional green onions and add a dusting of dried chives or more green onions on top.
- Jalapeño popper style: Add minced fresh jalapeños (seeded) or pickled jalapeños for heat. Keep the bacon bits for a classic combo.
- Cranberry and pecan: Add a small handful of chopped dried cranberries to the mixture and roll in pecans. This adds sweet, tart notes.
- Ranch and dill: Add a teaspoon of dried dill or a tablespoon of fresh dill for a fresh herb flavor.
- Smoky chipotle: Mix in a little chipotle powder or a spoon of adobo sauce for smoky heat.
- Garlic lovers: Add a small pinch of garlic powder for a stronger garlic note. Use a light hand, since Ranch already includes garlic flavor.
- Buffalo ranch: Stir in a tablespoon or two of buffalo sauce for a spicy, tangy kick. Adjust to taste so it does not get too wet.
- Vegetarian version: Skip the bacon bits. Add more green onions, a little smoked paprika, or chopped olives for extra flavor.
- Different cheeses: Swap part of the cheddar with pepper jack for heat, or Colby for a milder taste. Keep enough cheddar or similar cheese so the ball holds together.
- Herb coating: Roll the ball in chopped fresh parsley, dill, and chives for a bright green, fresh coating.
- Bacon outside: Keep the mixture simple and roll the outside in finely chopped cooked bacon for a crispy, smoky coat.
When you change flavors, keep the texture in mind. If you add wet items (like buffalo sauce), add them slowly and chill well so the ball still sets firm.
FAQs
- Can I make this cheese ball without nuts? Yes. Roll it in crushed pretzels, crushed crackers, chopped cooked bacon, or everything bagel seasoning. You can also serve it plain with no coating.
- How far in advance can I make it? You can make it 1 to 2 days ahead. Keep it wrapped and chilled. For the best crunch, add the nut coating closer to serving time.
- How long should I soften the cream cheese? Leave it at room temperature for 30 to 60 minutes. It should feel soft and spreadable. If you press it with a spoon, it should give easily.
- Can I use low-fat cream cheese? Yes. Low-fat cream cheese works, but the texture may be a bit softer. Chill it well so it holds shape. Avoid fat-free cream cheese, which can taste chalky and not hold as well.
- Can I use real bacon instead of bacon bits? Yes. Cook bacon until crisp and let it cool. Chop it finely and pat it dry. Use the same amount as the bacon bits. Real bacon tastes great and adds fresh crunch.
- How do I fix a cheese ball that is too soft? Chill it longer. If it still feels too soft, mix in a little more shredded cheddar to firm it up. Keep it cold until serving.
- How do I fix a cheese ball that is too salty? Add more cream cheese to the mixture to dilute the salt. A sprinkle of fresh herbs (like parsley) also helps balance saltiness. Serve it with unsalted dippers like fresh veggies.
- Can I freeze a cheese ball? Yes, but freeze it without the coating. Wrap it well and freeze for up to 1 month. Thaw in the fridge overnight and roll in nuts or other coatings before serving.
- How long can it sit out on the table? Keep it out for up to 2 hours at room temperature. Then put it back in the fridge for safety.
- Can I make mini cheese balls? Yes. Scoop small portions, roll them into bite-size balls, coat them, and chill. Serve with toothpicks. They are easy to grab and very party-friendly.
- What if I do not have Ranch seasoning? Ranch seasoning gives a classic flavor, but if you do not have it, use a mix of garlic powder, onion powder, dried dill, dried parsley, and a little salt and pepper. Add a little at a time and taste.
- How many people does one cheese ball serve? As a snack with other foods, one ball serves about 8 to 12 people. If your group loves cheese, make two to be safe.
- What dippers are best for this flavor? Butter crackers, pretzel crisps, celery sticks, carrots, cucumbers, and baguette slices are great. The creamy, smoky, herby flavor pairs well with both salty and fresh dippers.
- Can I add extra cheese? Yes, but do not add too much or the mixture may crumble. If you add more cheddar, add a little more cream cheese to keep the texture creamy.
- How do I transport a cheese ball? Wrap it tight in plastic wrap and place it in a container so it holds its shape. Keep it cold with an ice pack. Bring dippers in separate bags or containers and set up the platter when you arrive.
- Can I make it spicier? Yes. Add minced jalapeños, crushed red pepper flakes, or a splash of hot sauce. Chill well so it stays firm.
- Does the coating have to be only on the outside? You can also stir a small portion of finely chopped nuts, bacon, or green onions into the mixture for texture throughout. Then coat the outside lightly or leave it plain.
- Can I make it dairy-free? With this recipe, dairy-free swaps will change the flavor and texture a lot. If you need dairy-free, use dairy-free cream cheese and a dairy-free cheese alternative. Chill it very well so it sets.
- Can I shape it into something other than a ball? Yes. Shape it into a log for easy slicing, or press it into a small bowl lined with plastic wrap for a dome shape. You can also make holiday shapes (like a football or a pumpkin) for themed parties.
This homemade cheese ball is simple, tasty, and flexible. It takes just a few minutes to mix and shape, and it always draws a crowd. Use the base recipe, add the options you like, and serve it with a mix of crunchy and fresh dippers. You will get a creamy, bold, party-ready snack with very little effort.
Print
Homemade Cheese Ball
- Total Time: 120 minutes
- Yield: 8-12 servings 1x
- Diet: Vegetarian
Description
A rich and creamy cheese ball that’s easy to make and perfect for any gathering. Serve it with crackers or veggies for a fun snack.
Ingredients
Scale
- 8 oz cream cheese, softened
- 1 cup shredded cheddar cheese
- 1/2 cup bacon bits
- 1 packet Ranch seasoning mix
- 1/4 cup chopped green onions (optional)
- 1/2 cup chopped nuts (optional, for coating)
Instructions
- In a mixing bowl, combine the softened cream cheese, shredded cheddar cheese, bacon bits, and Ranch seasoning mix. Mix until well combined.
- Form the mixture into a ball shape, rolling it in chopped nuts if desired.
- Wrap in plastic wrap and refrigerate for at least 2 hours to firm up.
- Serve with crackers or veggies.
Notes
Feel free to adjust flavorings and coatings as per your preference. You can make mini cheese balls for bite-sized snacks.
- Prep Time: 10 minutes
- Cook Time: 0 minutes
- Category: Snack
- Method: No-Cook
- Cuisine: American
Nutrition
- Serving Size: 1 serving
- Calories: 250
- Sugar: 2g
- Sodium: 500mg
- Fat: 20g
- Saturated Fat: 10g
- Unsaturated Fat: 8g
- Trans Fat: 0g
- Carbohydrates: 6g
- Fiber: 0g
- Protein: 8g
- Cholesterol: 30mg
Keywords: cheese ball, party snack, easy appetizer, no-cook recipe