
Follow Me On Social Media!
Ultimate Gory Fudge Recipes Halloween Edition for Creepy Fun
Ultimate Gory Fudge Recipes Halloween Edition for Creepy Fun
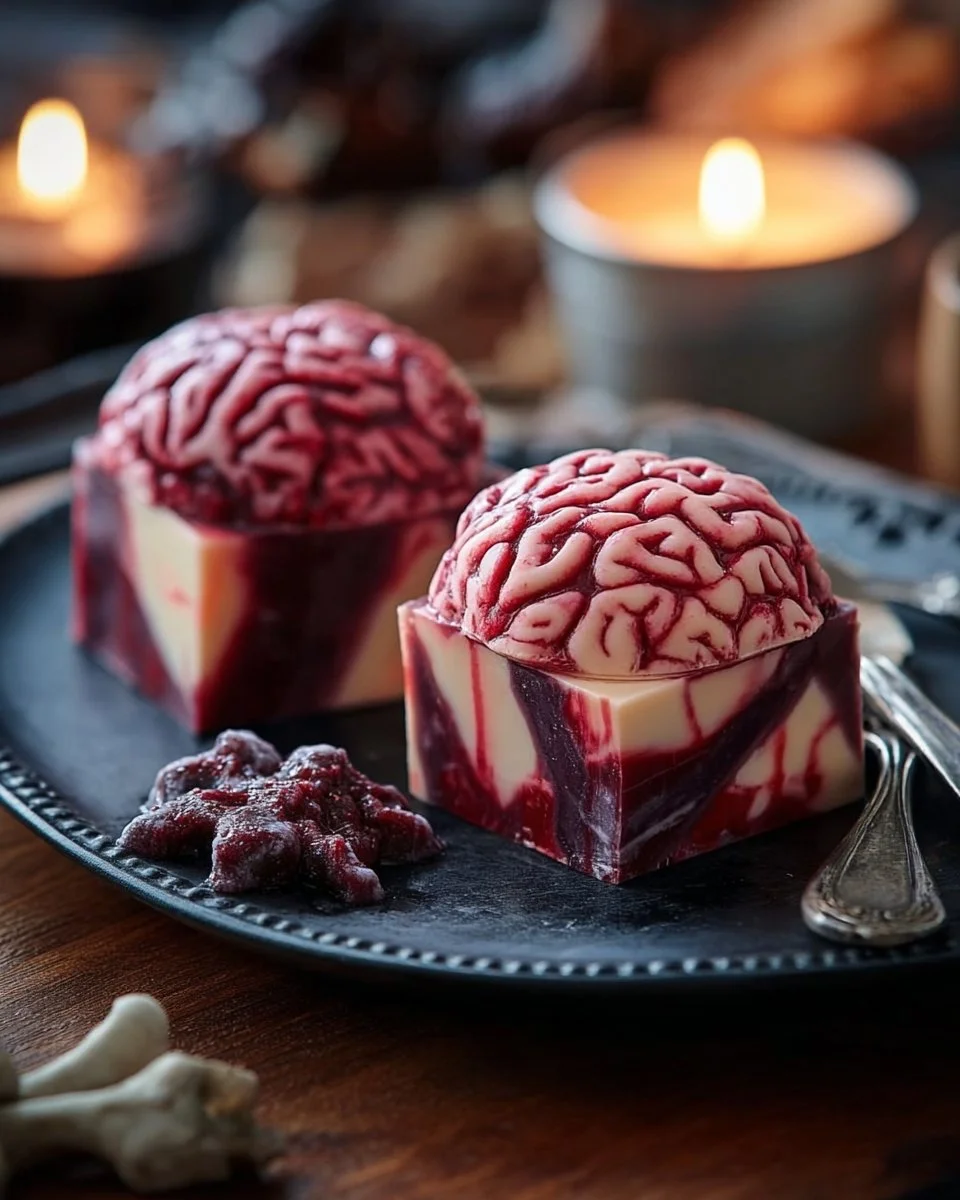
Halloween is a time for spooky decorations, costumes, and delicious treats. This year, why not get into the spirit with some Ultimate Gory Fudge? This fun and creepy dessert is perfect for Halloween parties, trick-or-treaters, or just a fun family activity. Creating treats that look like brain matter while tasting incredibly delicious is a game changer. Learn how to make this easy, yet frightfully good fudge that adds a unique twist to your Halloween festivities!
Why Make This Recipe
Making the Ultimate Gory Fudge is not just about satisfying your sweet tooth; it’s about having fun and creating a memorable experience. The rich, chocolatey flavor combined with creamy peanut butter and a surprise of raspberry jam adds a delightful taste. The brain mold gives the fudge an exciting appearance that will impress your guests and delight any Halloween enthusiast.
This recipe is not only easy to make but also offers options to customize it. You can choose to add more red food coloring if you want it to look extra bloody, making it a perfect addition to your Halloween-themed snacks. Plus, it’s an excellent opportunity to bond with family or friends while creating these creepy delights together!
How to Make Ultimate Gory Fudge
Making this recipe is simple and requires no baking! Just follow these steps carefully, and you’ll have spooky treats in no time.
Ingredients
Here’s what you need for the Ultimate Gory Fudge:
- 1 (14-ounce) can sweetened condensed milk
- 3 cups semi-sweet chocolate chips
- 1/2 cup creamy peanut butter
- 1/4 cup unsalted butter
- 1/4 teaspoon salt
- 1 teaspoon vanilla extract
- 1/3 cup raspberry or strawberry jam (seedless, for "blood")
- Optional: red food coloring
- Brain-shaped silicone mold
Directions
Follow these simple steps to create your Ultimate Gory Fudge:
-
Lightly grease your brain mold or mini muffin tin and place it on a freezer-safe tray.
-
In a saucepan, combine the chocolate chips, peanut butter, sweetened condensed milk, and butter. Heat on low, stirring until smooth.
-
Remove from heat and stir in the salt and vanilla extract for flavor.
-
Spoon the fudge into each mold cavity, filling halfway and pressing it up the sides.
-
Place 1 teaspoon of raspberry jam in the center of each cavity. Add red food coloring if desired for an extra creepy effect.
-
Top with more fudge to cover completely and smooth the tops.
-
Place in the freezer for 2–3 hours until firm.
-
Remove from molds and serve chilled or at room temperature for the full bleeding effect.
How to Serve Ultimate Gory Fudge
When serving your Ultimate Gory Fudge, presentation is key! Here are some fun ways to display these treats:
- Creepy Platter: Arrange the fudge pieces on a spooky platter with fake spiders or cobwebs for a dramatic effect.
- Wrap them Up: Package individual fudge pieces in clear bags tied with orange ribbons for a cute treat to hand out.
- On a Halloween Table: Set the fudge as part of a Halloween dessert table among other treats.
Don’t forget to encourage your guests to take a bite out of one to see the “blood” ooze out!
How to Store Ultimate Gory Fudge
To keep your Ultimate Gory Fudge fresh, follow these storage tips:
-
In the Refrigerator: Store your fudge in an airtight container in the refrigerator for up to two weeks. It will stay fresh and delicious.
-
In the Freezer: You can also freeze the fudge. Wrap each piece securely in plastic wrap and place them in a freezer-safe bag. They will last up to three months in the freezer.
-
Thawing: When you’re ready to enjoy the fudge, let it thaw in the refrigerator for a few hours before serving.
Tips to Make Ultimate Gory Fudge
Here are some handy tips to ensure your Ultimate Gory Fudge turns out perfectly:
- Chocolate Chips: Use high-quality semi-sweet chocolate chips for the best flavor.
- Butter: Be sure to use unsalted butter to control the overall saltiness of the fudge.
- Jam Choice: If you can’t find seedless raspberry jam, other flavors like strawberry work just as well!
- Red Food Coloring: Start with a small amount and mix well before adding more to get the desired "bloody" effect.
Variation
While this recipe is great as is, you can make it your own with these variations:
- Nutty Add-ins: Add crushed nuts or candy pieces for an extra crunch in every bite.
- Flavored Fudge: Mix in flavors such as almond extract or orange zest for a unique twist.
- Swirls: Instead of a layer of jam, swirl it into the fudge mix for a different look.
FAQs
What can I use instead of a brain mold?
If you don’t have a brain-shaped silicone mold, you can use a mini muffin tin or any other fun-shaped molds. Just make sure to keep the thickness of the fudge consistent.
Can I make this fudge dairy-free?
Yes! Substitute the sweetened condensed milk with a dairy-free version and use dairy-free chocolate chips. You can also swap the butter for coconut oil.
How long does this fudge last?
When stored in an airtight container in the refrigerator, it can last up to two weeks. In the freezer, it can hold its taste for about three months.
Can I add more layers to the fudge?
Absolutely! You can create layers by allowing each layer to set slightly before adding the next layer of fudge or jam, creating a more complex design.
Enjoy creating your Ultimate Gory Fudge this Halloween and impress your guests with this fun and delicious treat! Happy haunting!
Print
Ultimate Gory Fudge
- Total Time: 30 minutes
- Yield: 12 servings 1x
- Diet: Vegetarian
Description
A fun and creepy dessert for Halloween that looks like brain matter and tastes delicious.
Ingredients
Scale
- 1 (14-ounce) can sweetened condensed milk
- 3 cups semi-sweet chocolate chips
- 1/2 cup creamy peanut butter
- 1/4 cup unsalted butter
- 1/4 teaspoon salt
- 1 teaspoon vanilla extract
- 1/3 cup raspberry or strawberry jam (seedless)
- Optional: red food coloring
- Brain-shaped silicone mold
Instructions
- Lightly grease your brain mold or mini muffin tin and place it on a freezer-safe tray.
- In a saucepan, combine the chocolate chips, peanut butter, sweetened condensed milk, and butter. Heat on low, stirring until smooth.
- Remove from heat and stir in the salt and vanilla extract.
- Spoon the fudge into each mold cavity, filling halfway and pressing it up the sides.
- Place 1 teaspoon of raspberry jam in the center of each cavity. Add red food coloring if desired.
- Top with more fudge to cover completely and smooth the tops.
- Place in the freezer for 2–3 hours until firm.
- Remove from molds and serve chilled or at room temperature.
Notes
Store in an airtight container in the refrigerator for up to two weeks or in the freezer for up to three months. Allow thawing before serving.
- Prep Time: 15 minutes
- Cook Time: 15 minutes
- Category: Dessert
- Method: No Bake
- Cuisine: American
Nutrition
- Serving Size: 1 piece
- Calories: 250
- Sugar: 20g
- Sodium: 150mg
- Fat: 15g
- Saturated Fat: 7g
- Unsaturated Fat: 5g
- Trans Fat: 0g
- Carbohydrates: 25g
- Fiber: 1g
- Protein: 4g
- Cholesterol: 10mg
Keywords: Halloween, fudge, dessert, spooky treats, brain-shaped, chocolate